This may seem basic to some admins but I wanted to also add in some tips for adding Team Members and Generic Resources to Microsoft Project Server 2013 or 2016 or Project Online. There are other scenarios and situations for how to create them, but this will focus on
1. Giving people login access to PWA
2. Creating generic resources to have them available to add to schedules.
We’ll cover, costs, budgets, teams and materials later.
This is a prerequisite before the Project Managers and Schedulers can add them to their schedule. This allows people to log into PWA and be assigned to tasks in your project schedules.
- Click Settings
 > PWA Settings.
 - Under Enterprise Data, click Resource Center.
-
Click Resources > New.

- In the Type section, complete the following:
- Type Choose Work resource.
- Budget – Save this for another day
- Generic If the resource is generic, meaning that you will use it for planning purposes and replace it with a named resource later in the planning process, select the Generic check box.

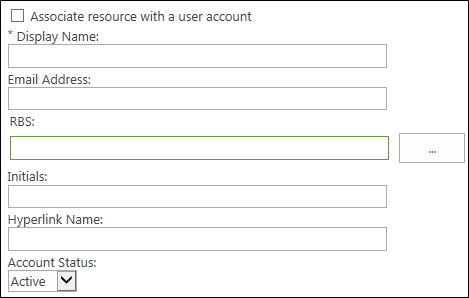
- In the Identification Information section, complete the following:
- Associate resource with a user account Select this check to be a Project Web App user.
- Display Name Type the resource’s name in this box. This field is required. (The best practice is to be Last Name then first name. No characters just spaces)
- Email address If they don’t need to get reminders, alerts or anything from PWA or the Project Sites, leave this blank.
- RBS This is the resource breakdown structure (RBS), very similar to the Org Chart. We use this for reporting and security to provide visibility for Resource managers and Direct reports. Click the button next to this field and choose the appropriate RBS code for this resource from the list.
- Initials This field is automatically populated with the resource’s initials, based on the name typed in the Display Name box. If you want to use different initials to refer to this resource, type them in the Initials box.
- Hyperlink Name Leave it blank
- Account Status Set to Active. You can change this to Inactive if they no longer part of PWA projects or PWA.

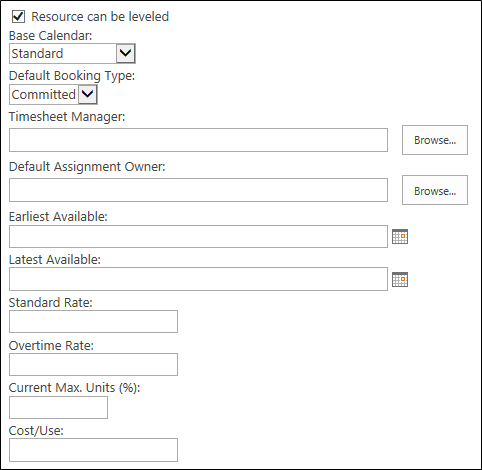
- In the Assignment Attributes section, complete the following:
- Resource can be leveled If you want to enable project managers to balance this resource’s workload based on his or her availability and assignments (leveling), select this check box.
- Base Calendar Leave it at Standard.
This is the default calendar that we modify with all the company holidays. Unless you must, do NOT create a separate calendar if you can just start with the standard. It’s more work for the PMs, Schedulers and you as the admins if you must select the calendar for every resource and schedule. People forget and then the dates are wrong. If we have special resources in different countries we can create a calendar for them and select that calendar.
- Default Booking Type Leave it at Committed
- Timesheet manager Type the name of the person who approves or rejects this resource’s timesheets, or click Browse to choose the timesheet manager from a list.
-
Default Assignment Owner Type the name of the person who approves or rejects this resource’s task progress, or click Browse to choose the assignment owner from a list. Resources may not have separate assignment owners. For example, if the resource is a conference room, and the project manager tracks the amount of time that the conference room is used, the assignment owner may be the project manager.
Tip You can set the assignment owner within the project on an assignment-by-assignment basis.
-
Earliest Available Choose the date when the resource becomes available to assign to tasks, if appropriate. If the resource does not have a set period of availability (that is, if he or she is always available), leave this blank.
Note The earliest and latest available dates correspond to the resource availability dates for a resource, as seen in Project Professional.
- Latest Available Choose the last date that the resource is available to work on tasks, if appropriate. If the resource does not have a set period of availability (that is, if he or she is always available), leave this blank.
- Standard Rate Type the resource’s standard pay rate in this box. We can also use a blended rate.
- Overtime Rate Type the resource’s overtime pay rate in this box.
- Current Max. Units (%) Specify the maximum amount of time that a resource is available for work, as a percentage. For example, if the resource is available full-time, type 100%. If the resource is available half-time, type 50%.
- Cost/Use Not used for standard Team Members

-
In the Departments section, click the button next to the Resource Departments box, and choose which department(s) the resource is associated with. If the resource is not associated with a department, leave this blank.

Tip Associating a resource with a department narrows down what the resource sees when using Project Web App. It can help the resource find what he or she is looking for more quickly, by removing things from other departments that do not apply to his or her work.
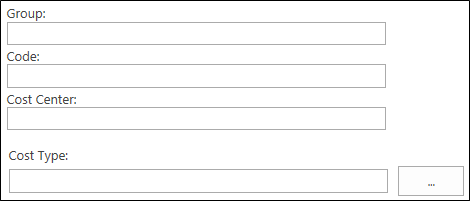
- Do NOT USE YET – We can use these for grouping and costing purposes, in the Group Fields section, complete the following: (We’ll add these later…do NOT use these yet)
- Group Type the name of the group in this box.
- Code Type the code for the group in this box.
- Cost Center Type the cost center code for the group in this box.
- Cost Type Click the button next to the Cost Type field, and then choose the type of cost associated with this group.

-
Do NOT USE YET – In the Team Details section, click the button next to the Team Name box, and choose which team the resource belongs to, if appropriate. If the resource will be managing and delegating tasks that are assigned to the team, select the Team Assignment Pool check box. (We won’t use this yet)

Tip You can create a generic resource for each team, so that tasks assigned to the team first go to the generic resource. This way, no single resource takes on the task assignment before it is appropriately delegated. If you choose to use a generic resource in this way, set the assignment owner for the resource as the team’s Resource Manager, select the Team Assignment Pool check box, and choose the team from the Team Name list.
-
Do NOT USE without full understanding – In the System Identification Data section, type additional identifying information for the user in the External ID box, if appropriate.
For example, your organization’s HR department may use employee ID numbers to track data in their HR systems. By providing that ID number in the External ID box, you identify an association between the resource that you are creating and the HR department’s employee data. The External ID box can also be used to facilitate the consolidation of reporting of resource use beyond what Project Server provides. Tip If you are not sure whether you should be capturing any data in the External ID box, check with other departments in your organization to find out if it would be useful to connect resource data with other systems, or simply leave this box blank.
- Click Save to create the new resource.
Once the resources have been created, the schedulers or project managers can add those resources to their project schedules.
Author Profile

Latest Entries
 PMO RoadmapsOctober 3, 2025Resource Manager Benefits with Project Server
 PMO RoadmapsOctober 2, 2025Benefits of Project Server for Project Managers
 ConsultingMay 21, 2024Startup Recommendations: Why Use Microsoft Project Online and Office 365
 Project OnlineApril 2, 2024The Ultimate Guide: Benefits of Microsoft Project Online for Finance


